

Views: 0 Author: Site Editor Publish Time: 2026-11-16 Origin: Site


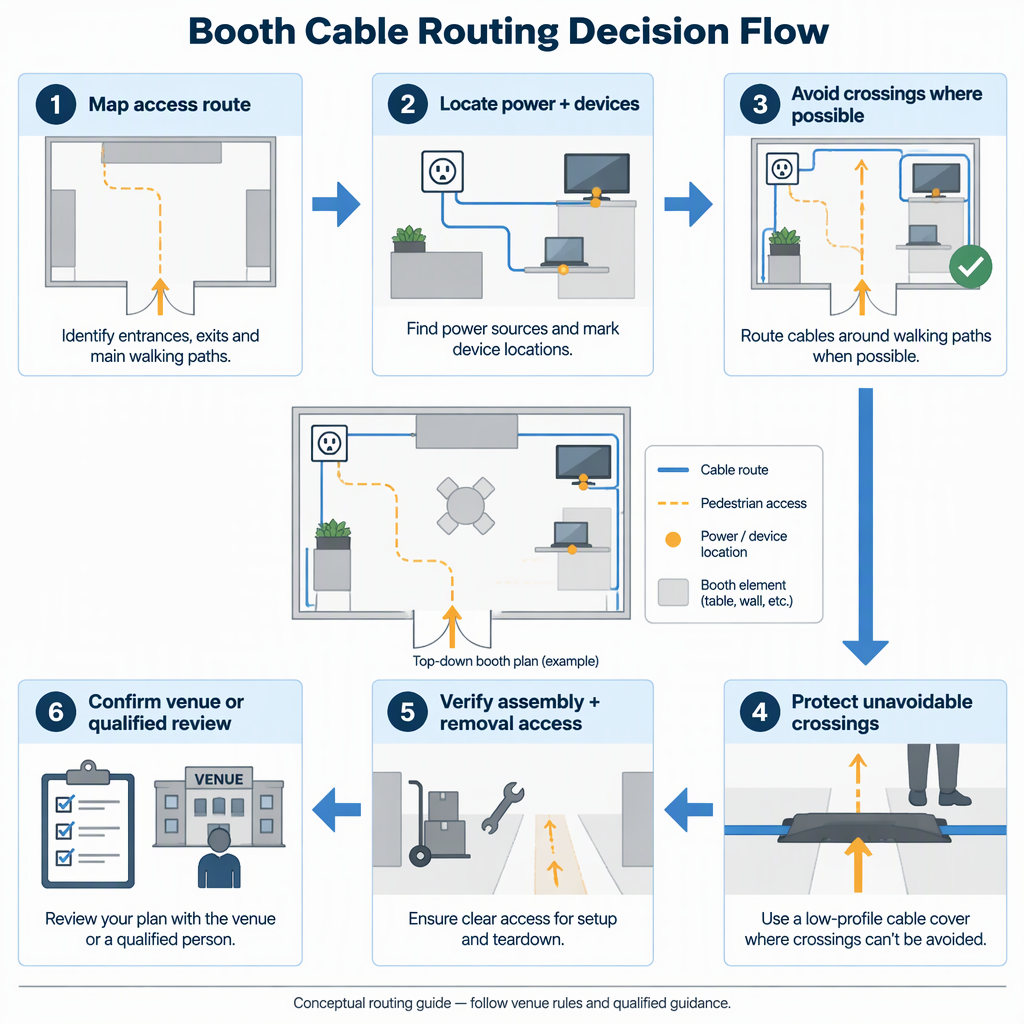
Route booth cables as part of the booth plan, not as an afterthought: map power and device locations, protect continuous visitor circulation, avoid route crossings where possible, and keep installation and removal access clear. Where overground cables must cross a walking route, reduce trip risk and mechanical damage with deliberate protection such as a suitable ramp or similar cable-protection method. For U.S. ADA contexts, the accessible-route reference point is a continuous clear route, including the 36-inch clear-width guidance described by the U.S. Access Board.
Before finalizing booth structure, graphics, counters, screens, lighting, or flooring, map the layout, access routes, power needs, and likely cable routes together.
Start with a scaled floor plan that marks visitor entry, exit, staff positions, product-display zones, and service access.
Add power and data demand points: monitors, lighting, demo equipment, payment devices, charging stations, reception desks, and storage areas.
Identify cable paths that can remain outside public circulation or be segregated from visitors where practicable; HSE event electrical guidance specifically treats layout, access routes, power requirements, and temporary cable routing as planning items.
Mark any unavoidable crossing before the stand is quoted, because a late crossing can affect flooring choice, ramp placement, graphic-panel breaks, and installation sequence.
For portable and modular exhibition booths, this early mapping also helps dealers and design teams separate structure decisions from electrical decisions. A lightweight display wall may assemble quickly, but a poorly placed cable bundle can still block a service opening, delay panel alignment, or force installers to work around visitors during final setup.
Treat access as a connected route through the booth and venue approach, not just as an empty patch of floor inside the stand.
In U.S. ADA guidance, accessible routes connect accessible spaces and elements, and the U.S. Access Board describes a 36-inch continuous clear-width requirement with limited reductions at certain points such as doorways. Confirm the adopted accessibility rules, venue requirements, and local amendments for the actual show location.
The U.S. Access Board guide to accessible routes frames the route as a connected set of components, including walking surfaces, doorways, ramps, curb ramps, elevators, and permitted platform lifts. For booth planning, that means a cable path should be checked against the whole circulation path: aisle entry, reception counter, product demo position, meeting area, and exit route.
Use the stricter practical constraint when several rules apply. A show organizer may set its own aisle and floor-covering conditions; a venue may restrict drilling, overhead rigging, or floor-channel use; local accessibility requirements may differ by jurisdiction. Cable management works best when the clear route is drawn first and the cables are then routed around it.
Choose the cable zone by balancing visitor circulation, mechanical protection, installer access, and the venue’s permitted installation methods.
Routing zone | Best fit | Main check before use |
|---|---|---|
Perimeter or rear edge | Good for counters, storage walls, and equipment placed away from visitor movement. | Confirm the route does not block installer access, emergency circulation, or access to supplies. |
Protected floor crossing | Useful when a device must sit on an island counter or demo point. | Minimize tripping hazards and mechanical damage; use suitable protection where overground cables cross route ways. |
Overhead routing | May suit suspended lighting or high-level services where the venue and show rules permit it. | Check temporary overhead-cable routing, public-area separation, support, and qualified installation requirements. |
Underfloor or floor channel | Can keep visible surfaces cleaner when the stand system and venue floor allow it. | Confirm access for safe installation and removal before the floor is covered. |
Integrated service channel | Fits some modular structures where service paths are planned into counters, walls, or frames. | Protect connections and avoid cable strain at panel joints, corners, and moving assembly points. |
No single route type wins in every booth. The right choice depends on where people walk, where equipment sits, what the venue allows, and how the stand is assembled and dismantled.
If a cable must cross a walking route, make that crossing short, visible to installers, mechanically protected, and compatible with the required clear route.
Use a crossing only after perimeter, rear-edge, overhead, underfloor, or service-channel options have been considered.
Select protection that reduces trip risk and protects the cable from foot traffic, carts, and display movement.
Keep connectors away from high-traffic pinch points where they may be kicked, crushed, pulled, or hidden under flooring.
Check that any ramp or cover still allows the required accessible route for the jurisdiction and venue.
Before touching, moving, or accessing powered equipment or cable connections, switch off and disconnect the relevant power source, then follow the equipment manual and venue procedures.
Cable covers are not a substitute for planning. They are a protection measure for crossings that remain necessary after the route has been simplified. Poorly placed covers can still obstruct wheels, create awkward turns, or interfere with booth assembly.
A good booth cable route must work during build-up, show hours, maintenance, and dismantling—not only in the finished rendering.
Install structural frames, flooring, and heavy display elements in an order that leaves safe access to supplies and cable paths.
Run cables before panels or flooring permanently hide connection points that may need inspection or removal.
Protect cables from mechanical damage during cart movement, counter placement, product loading, and dismantling.
Separate public areas from electrical installation work where practicable, especially during late setup or early opening periods.
Plan removal so installers can disconnect and retrieve cables without lifting loaded counters, forcing panel disassembly, or crossing active visitor areas.
For modular booths, the assembly plan should show where cables pass through or around frames, fabric graphics, counters, shelves, and lightboxes. The aim is not to hide every cable at any cost; it is to keep cable paths accessible enough for safe installation and removal while preserving the finished visitor experience.
Before requesting a cable-management quote, provide the supplier with the booth layout, access route, equipment locations, power needs, and installation constraints.
Booth size, open sides, aisle positions, reception points, storage areas, and visitor-flow direction.
Power and data requirements for lighting, screens, demo equipment, payment devices, routers, chargers, and staff workstations.
Clear-route requirements for the target venue and jurisdiction, including any accessibility instructions from the organizer.
Locations where cables might cross walking routes and the preferred method for protection or rerouting.
Venue rules for overhead routing, floor covering, drilling, tape, ramps, underfloor services, and electrical contractor access.
Build-up and dismantling sequence, including when power is available and when the booth must be handed over.
Do not rely on a single product name such as “cable ramp” or “floor channel” as the full specification. Ask how the route will preserve access, how it will be installed, how connections will be protected, and what information the venue or electrical contractor still needs.
General booth cable-routing principles do not replace venue rules, show-organizer instructions, local accessibility requirements, or qualified electrical review.
Accessibility guidance varies by jurisdiction and adopted standard. Use the U.S. Access Board clear-route guidance as a planning reference for ADA contexts, then confirm the current requirement for the actual venue and event.
Electrical arrangements should be reviewed against the event’s power supply, temporary installation conditions, public-area separation, and access requirements. If manual access to powered equipment or cable connections is needed, switch off and disconnect the relevant power source first, then follow the equipment manual and the venue’s permitted procedure.
For buyers, the practical question is not “Can the booth hide cables?” It is “Can the booth route, protect, access, and remove cables under the rules of this event?” That question should be answered before graphics, flooring, and modular-frame details are locked.
The best exhibition booth cable-management plan starts with the route: protect circulation first, choose the least disruptive cable zone, protect unavoidable crossings, and keep assembly access open.
Before requesting final pricing or drawings, give your booth supplier the floor plan, device list, access-route requirement, crossing points, venue rules, and build schedule. Use that information to compare practical routing options and avoid assumptions in the quote.
Buyers usually need quick answers about route choice, access clearance, crossings, and assembly timing before selecting a booth cable-management approach.
The best route is the one that keeps public circulation clear, protects the cable from damage, and still allows safe installation and removal. Perimeter, overhead, underfloor, and service-channel routes should be compared against the booth layout and venue rules.
A crossing may be necessary, but it should be minimized and protected. Use an appropriate cable ramp or similar protection where overground cables cross route ways, and confirm that the crossing does not compromise required access.
For U.S. ADA contexts, the U.S. Access Board guide describes a 36-inch continuous clear-width requirement for accessible routes, with limited reductions at certain points. Confirm the current adopted rule for the show location.
Modular booths are assembled and dismantled in sequences. Cable paths that are hidden too late, trapped behind panels, or routed through moving joints can slow installation and make safe removal harder.
No. A ramp or cover can protect an unavoidable overground crossing, but it does not replace route planning, access checks, connector protection, and venue approval.
Send the booth plan, equipment list, power and data points, access-route needs, venue restrictions, likely crossing locations, and build-up and dismantling timing.
The final route should be checked under the event’s electrical, venue, organizer, and contractor requirements. Use qualified electrical personnel where the installation, connection, or power arrangement requires it.


